Saturday, 31 October 2020

The Making of: Rohan Valley Diorama

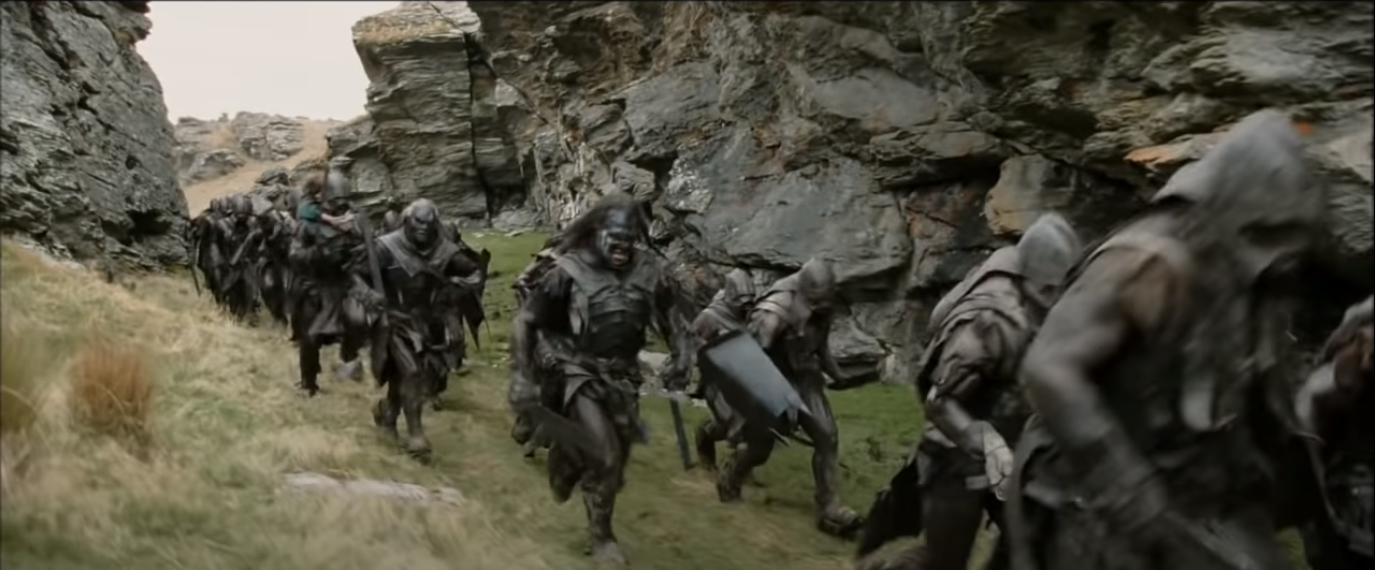
 So it appears after working on the Dwarrowdelf display board, I got bitten pretty hard on the whole diorama/display board hobby. Looking at my current armies, I had a few options to go for. One which particularly leapt at me allowed me to display two different armies depending on what I was running or wanted on display. Those two armies were Rohan and Isenguard. The location I wanted to make? Well this was quite specific in some regards - one of our first introductions to Rohan besides the rolling plains is a much more up close and personal scene including some Uruk-Hai and Orcs in a ravine. 

This offered some nice things to work with hobby-wise and from a compositional stand point - namely the rising rocky faces on either side of the valley (also screaming out to the rock-climber in me). For this I had a few ideas in mind, the first being to build up the sides using foam and then add some character by attaching plaster casts of rock faces. In between these I'd build up the foam and sculpt it to blend in. With that plan in mind, let's see how I go about it!

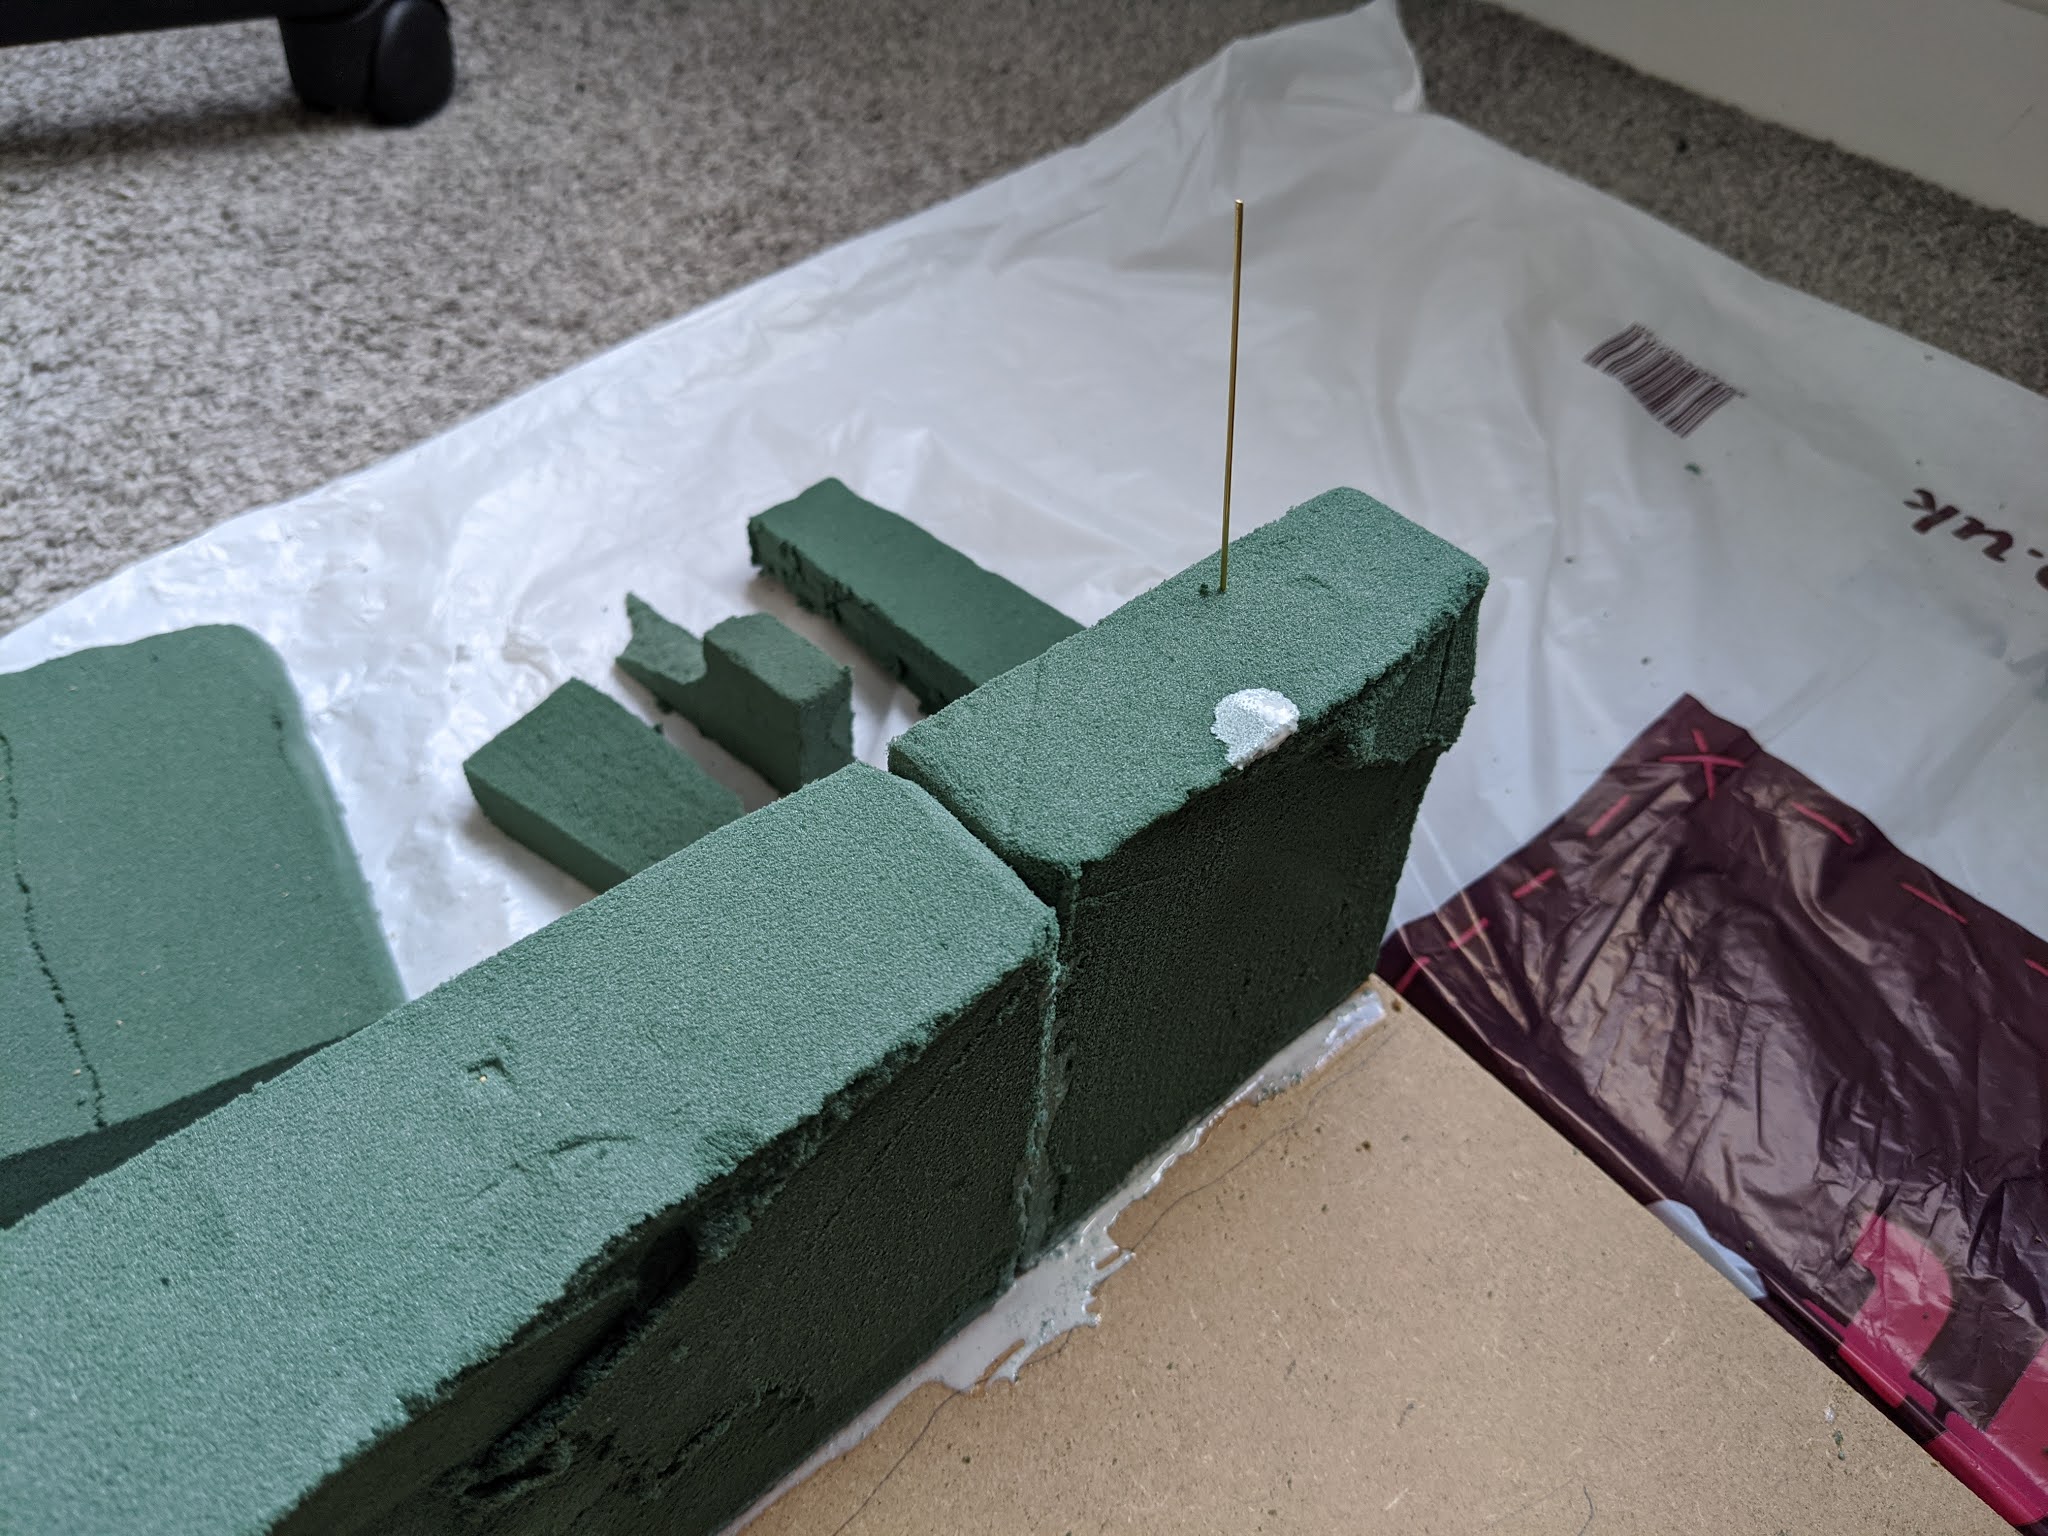
The foam I decided to go with is just your standard foam used for flower arranging (a full list of tools and materials used will be at the end of the article). The pros to this behind that it's very easy to carve and manipulate along with having a nice gritty texture that lends itself well to rock faces. The cons however are that it is indeed very easy to manipulate, one slightly to forceful grip on it can leave lasting impression upon the material. Given the height of it I also wanted to secure it to the board a bit more, so drilled into the MDF base and inserted some brass rods to add a little more stability during the construction. 

With the main skeleton sorted it was time to move on to the basis of the rock faces - the plaster casts. The ones I picked out were a couple of rock molds made by Woodland Scenics as they had incredibly crisp looking designs which would work great when it came to painting and weathering. Using a bit of their plaster I got to setting...or so I thought. The first batch I made was a bit of a disaster. I thought I'd used the right ratio of water to plaster, but as I found out the slightest drop of water can dramatically alter the consistency. The first batch ended up with too much water, and unfortunately fell apart when removing from the mold. With the ratio tweaked a little bit I managed to get a clean set of casts for the second and then got to applying them to the foam.

Now when I initially bought the moulds, I thought a cast of each (I bought two) would be enough for both sides and it turns out I was wrong! Only one side got covered and I will admit that to start with it looked a bit awkward. With some quick sculpting to the lip of the wall it started to look a lot better. During this time (and waiting for the next casts to dry) I set about making the base of the ravine, and this is where the malleable nature of the foam helped a lot, as I was able to depress certain areas quite easily to give an uneven appearance. Looking at the side I'd already made, it also looked a little flat. So whilst waiting for the casts I got to adding a bit of depth in the form of outcrops and some ground slanting down from the wall into the base. When it came to apply the next casts, it gave a much more interesting appearance and then set to further blend all the components by sculpting the foam with a few models tools to scrape certain areas away.

With all the sculpting work done it was time to get to the colour. Another problem with foam however is that it absorbs moisture incredibly well, so spray base coating it would end up going through quite a few cans! The first step I decided was to go with masonry paint. Given it's thicker than regular paint consistency it also meant I could plug up a few gaps in the base and tone down a few of the harder edges between bits of foam. With this layer then dry, I took a can of Tamiya Wooden Deck Tan (the closest I could get in spray form of Steel Legion Drab which I've coated by model bases in) and gave the whole thing a good coat.

For the next step it was time to add some more texture and colour to the base and top of the ridges. The bases on all my Rohan and Isenguard are identical in how they're achieved so I went for a similar process so that they'd sit well on the terrain - a layer of Gale Force 9 Super Fine Basing Grit, with a layer of Element Games Autumn Grass flock on top in patchier areas. This is quick and easy with small based miniatures; on a larger scale it was going to get very messy. On top of that I also had a lot of painting to do to the actual rock faces.

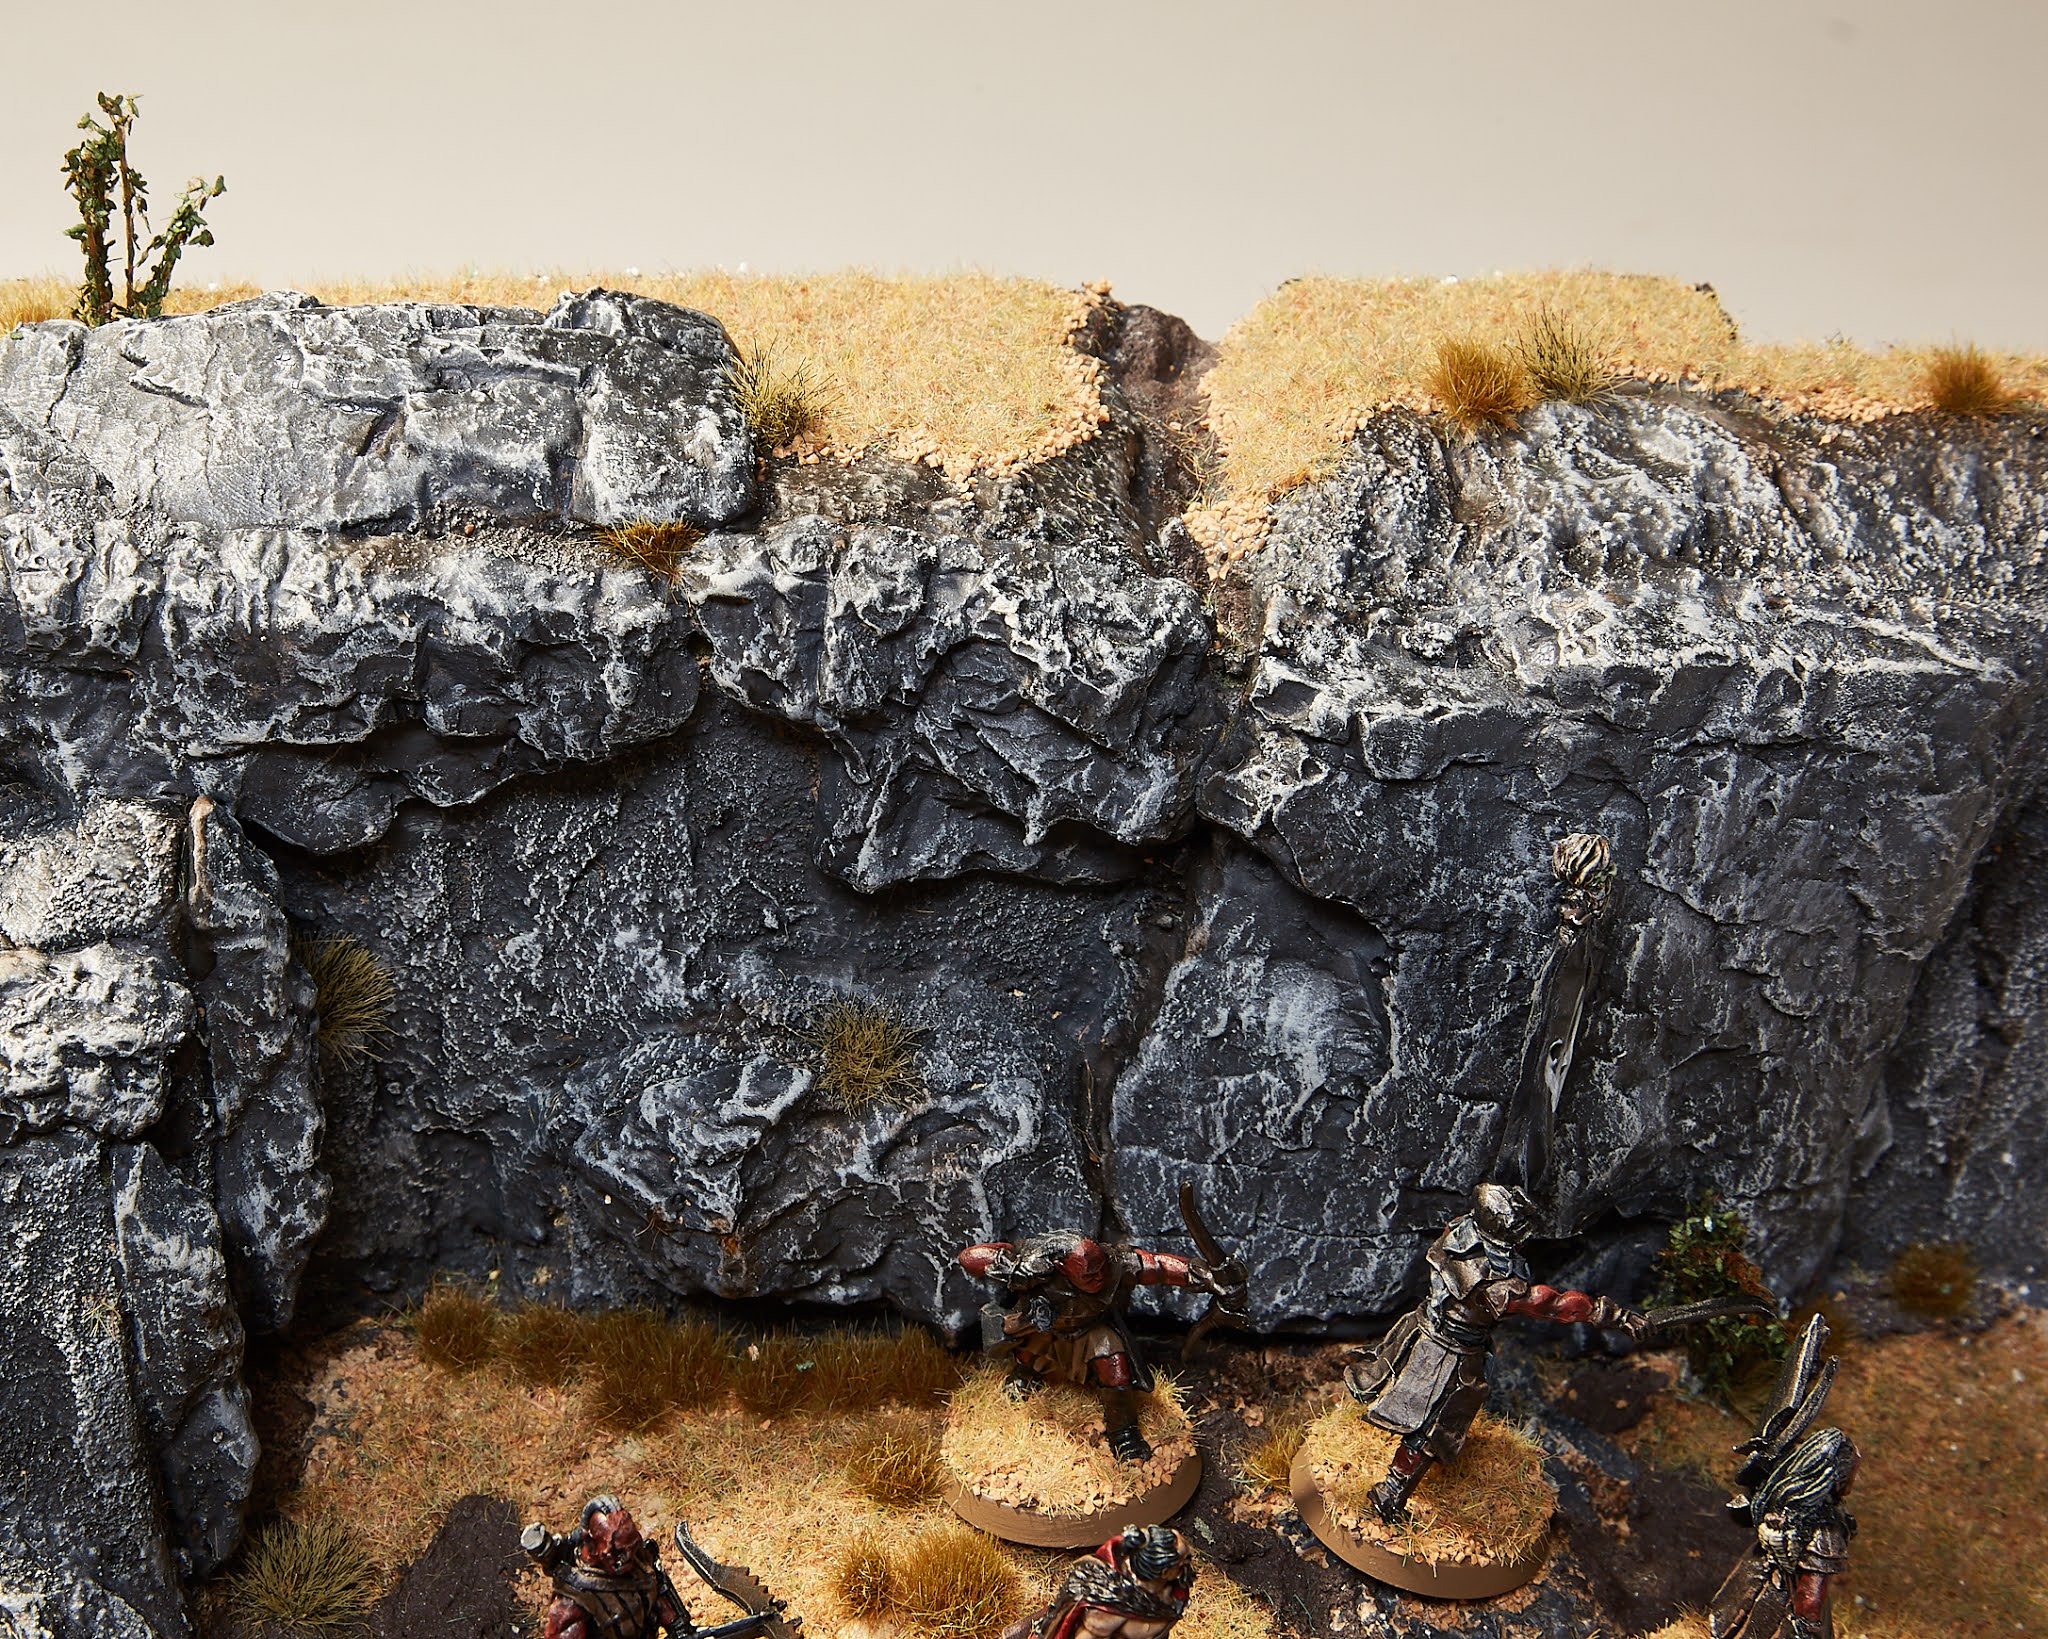
With the layer of grit down I worked away at the rock faces as I wasn't too fussed if some of the paint got onto the grit and most of this would eventually be covered in flock. The best way I've come to work with weathering (especially to make realistic and interesting looking rock) is to build it up in layers continuously, but more sparingly each layer. For this set I started with a base of Eshin Grey (slightly watered down to provide more coverage), then when dry applied a fairly liberal coat of Dawnstone. Given that I said we'd build this up in layers, I decided to darken the whole thing, especially to seep into the dark nooks and crannies of the sculpt with a 1:1 mix of Nuln Oil and Lahmian Medium - as my Dad always told me "You can always add more, you can't necessarily take away" and that rings true to me with washes. With this dried off, I built up the next layers with more Dawnstone, some Terminatus Stone and finally Longbeard Grey all in smaller and lighter quantities to build up nice gradients. As for the non rocky parts in order to break up the base I added some Stirland Mud to certain areas, namely where water might pool more easily such as the ridges leading into the ravine and around the outcrops. These areas also received a small amount of Agrax Earthshade (along with the top of the ravine) to give a sense of weathering.


The next big messy step came in the form of applying the flock. This also did not go well and I ended up spilling most of a pot outside when adding it to the Static Applicator's hopper! I did however manage to salvage enough get the coverage I needed onto a layer of PVA basing glue. After leaving this to dry there as an awful lot extra to filter off, the worst part being that it snuck into a few of the rock recesses, but nothing a bit of brushing with a stiff paintbrush couldn't deal with. Now it was time for the final touches to be added - the foliage. Most of it shown in the image above is grass mounds from Army Painter (a mix of Highland Tuft and Winter Tufts), I did however drill a few holes in order to insert some shrubs from Green Stuff World. With all the detail added all I needed to so was neaten up the outside with some polyfiller, sanding down and a frame of black paint. It was then off to the studio to bring it fully to life with some miniatures.


And there we have it, the finished product punctuated with a Uruk Scout force, and some sneaky Three Hunters on their trail. I would have loved to completely recreate the encounter between Ugluk and Grishnakh, but I unfortunately lack a few of the miniatures at the moment. Once I get my hands on them however I'll be getting some more photos on this in the future! I hope you've enjoyed reading through the progress of this board, it certainly was a fun one to make, any question just leave us a comment below!

Materials:
MDF
Plant Foam (Hobby Craft)
Masonry Paint - Goodhome Masonry Tester
Wooden Deck Tan Spray - Tamiya
Citadel Paints - Eshin Grey, Nuln Oil, Agrax Earthshade, Dawnstone, Terminatus Stone, Longbeard Grey, Lahmian Medium.
Black - Stuart Semple
Super FineBasing Grit - Gale Force Nine
Autumn Grass Flock - Element Games
Highland Tuft, Winter Tuft - Army Painter
Tall Shrubbery Brown Green - Green Stuff World


Friday, 16 October 2020

Introducing people to Middle Earth : Strategy Battle Game

Over the course of lockdown, I have seen a lot of posts from people who have started up the hobby and used their new-found free time to paint up their first army. We in this community are very fortunate to have such a stable, constructive outlet during what has been, for many, a time filled with uncertainty and frustration. 

Now that measures are tentatively easing in some areas, and gamers are emerging bleary-eyed from their hobby caves, we find ourselves with a fresh audience of eager gamers ready to play their very first games. So at DC, we thought it'd be good to create a resource to help both students and teachers to get in to the game as quickly and painlessly as possible! So without further ado:

How to introduce people to Middle Earth SBG – and board games in general!

Newsflash - teaching is a very difficult skill to learn. It’s something that we often see done very well in gaming circles, but it can also be done quite badly, and lack of effort on the part of the teacher is not to blame. I haven’t had many chances to teach somebody how to play SBG from the ground up, but I have played and taught an enormous amount of board games in my life - and exactly the same rules apply. I’ll go over a few of the things I think it’s crucial to keep in mind in order to get somebody actively engaged in the game, and on track to beating you in future tournaments!

I’ll be assuming that you’re teaching your newbie through a ‘demo game’, and they haven’t yet picked up the rulebook.

1: Their first game is not about you.

The most important rule. For the first game, you are not a competitor – you are their full-time mentor. This is not the time to showcase your tactical skills. Every decision you make should not be a step towards victory, but towards giving them an engaging learning experience. It is important that they understand everything that they are doing, why they are doing it, and what consequences this will have for the outcome of the game. And it is your job to deliver this information in a digestible and fun way.

If you have brought your most competitive yellow alliance list down to the gaming centre, and are looking for some hardcore tournament prep games, it might be best to hand over to your friend with the fluffy Minas Tirith list for some tutorial games. Your newbie will learn nothing from being stomped. Which brings us to…

2: First Impressions Matter!

Perhaps even more important than teaching the mechanics is providing a positive, fun gaming experience for their first outing. Nothing will send a new player running for the iron hills faster than getting mercilessly stomped on game one. Those impressions really stay with people, and if you let it happen, you’ve lost a potential valuable community member, competitor, or future friend! Try to play on the same ‘wavelength’ as your newbie – don’t use rules they haven’t yet learned against them. Use what they have learned to provide an enjoyable game where they can make meaningful decisions. That being said…

3: One step at a time.

We all know the feeling of trying to take in too much information at once- it’s unpleasant, and you don’t want that to be your newbie’s first impression. Take baby steps, and keep everything relevant to what’s going on. Don’t begin by explaining victory points, heroic actions, magic powers, break points and ally matrices. If you do decide to use a matched play scenario, ensure it’s a simple one like ‘To the Death!’ – with points for wounding the leader, breaking and quartering your opponent, and killing banners - which are all things that will be useful to think about in all future games. But for a learning game, I think just forgoing a scenario entirely and just having a skirmish is totally OK.

How quickly you bring in new rules will depend on your newbie’s level of experience – but generally you’ll start by explaining warbands and deployment, and then begin moving your forces across the board. Maybe also go in to a tiny bit of detail on how to successfully engage – but again, don’t get bogged down in the details. If they are putting spears in front of swords or running off the map, by all means correct them, but this isn’t the time to start reciting Sun Tzu.

As the game goes on, you’ll bring in duel and wound rolls, control zones and pairing off, shooting and fight values, making way, traps and courage tests. Keep this snappy, keep the dice rolling, and make sure your newbie is happy with each mechanic before moving forward. If they’re confused, don’t drag them by the hand - hold back on introducing the next new mechanic until they feel comfortable. 

Remember that what is very simple to you might be completely baffling to them, and don't get frustrated if they struggle with certain concepts. Remember, we were all noobs once!

By the end of their first learning game, you want them to feel comfortable with the core combat loop - with maybe a few basic heroic actions and special rules thrown in. It might seem like baby stuff to a seasoned player, but it will be plenty for a demo game. It's important to remember that the area-based combat mechanics hold a lot of hidden complexity, which can melt the brain of even a seasoned player during long sessions, and just taking this in may be plenty for their first game. For a second game, you could try bringing in a matched play scenario and start talking through victory conditions, and if they’re comfortable, get your newbie thinking about overall strategy.  


4: Keep armies simple and balanced.

Odds are, your newbie will want to throw down a Gandalf, Sauron, Balrog or Mumak on game 1. Who can blame them? These are awesome units and will add a lot to any game of SBG. But are they really going to help them learn the game?

Bitter pill though it may be, it’s probably best to leave these units at home until they have a couple of games under their belt. Stomping an entire force with a Mumak feels awesome, but it won’t teach your newbie much about the game other than how to stomp guys with a Mumak.

For game number one, I suggest playing 300-400pts of troops, cavalry, archers (optional) and generic captains. Include a range of fight values. Try to stay away from characters that ‘break’ the core mechanics of the game, E.G. Ingold – you’re teaching the rules, not the exceptions. This will give a solid foundation, and will get your newbie making important decisions using the game's fundamental mechanics – which should be plenty to sink their teeth in to for the first few hours. I would use something like the following:

Minas Tirith (400pts)

Faramir, horse, lance, shield
3 x Knight of Minas Tirith, shield
6 x Ranger of Gondor, spear
5 x Warrior of Minas Tirith, shield

Captain of Minas Tirith
6 x Warrior of Minas Tirith, shield
6 x Guard of the Fountain Court, shield

Mordor (395pts)

Goroth
6 x Morannon Orc, shield
6 x Morannon Orc, shield, spear

Orc Captain, shield, warg
4 x Warg Riders, throwing spear

Orc Captain, shield
5 x Orc Warrior, orc bow, spear
5 x Orc Warrior, shield 

Are they optimised? Not at all! But they’re generic, roughly balanced, and will give your newbie a snippet of all the mechanics they’ll need. It’s also quite a nice thematic matchup between the more elite Minas Tirith guards and the Orc rabble. Faramir is the unit with the most potential here, so I’d give the Gondorians to your newbie so that they can pull off some fun shenanigans.

The ‘learning curve’ is something we actually see done very well in video games – they don’t start you off by fighting the final boss, or using the game’s most powerful and situational toys. They start you on the basics, and bring in complexity at a rate that the player can digest. The trick is to introduce fun new mechanics steadily to keep up engagement, but slowly enough that your newbie can digest everything to build up an understanding of the core gameplay.

On this same point, a lot of people recommend Battle Companies as a way of learning the game, but I personally do not agree – BC is great, but I find that the mass of extra rules can get in the way of the basics. I think the lists above equip your newbie far better for an actual game of SBG.

5: Sell sell sell!

When I said you’re a full-time teacher, I wasn’t actually telling the truth. You are also a salesperson! The second job you need to do in the first game is to demonstrate how great SBG is, and why they need it in their life.

This is done by presenting the game in a way that showcases its strengths. Make sure you hit all the highlights in the first game – not just by explaining them, but by making sure your newbie interacts with them. When this game is played well, it captures the feeling of clashing, grinding battles, where positioning is everything and one crucial breakthrough can win the day. A newbie picking up the game by themselves might not see this right away – they’ll be too busy grappling with rulebooks. But, with your guidance, they can get right in to the ebb and flow of battle. Think of yourself as the ride-along salesperson on their first test drive.

In the first game, I think the key points to hit are:

  • Give a really clear example of control zones. It’s one of the cooler but more confusing parts of the game, so make sure to demonstrate it in a really engaging way.  
  • Have your newbie set up a daring cavalry charge – Ride of the Rohirrim quotes optional, but encouraged.
  • Show your newbie the devastation that happens when a rank of soldiers gets surrounded and trapped (if they’re the sensitive type, maybe have them do this to you, rather than you to them!)
  • Showcase the duel mechanic, and if you can, how to leverage higher fight values to your advantage.
  • Showcase some heroic actions, and make sure your newbie does some fun stuff with their heroes. Try to engineer situations where their heroics have a high impact. (And speaking of which…)

6: Take a dive if you have to.

If you’re in a position where your newbie friend has made some errors (which is likely) and you could crush them easily – don’t!

This doesn’t necessarily mean you have to lose the game. But it does mean that you should pull enough punches that your tutee still gets to make meaningful decisions and see the consequences of them. For example, if they set up a smart cavalry charge, perhaps don’t counter it with a heroic move (even if you could). Reward them for using the mechanics in a smart way – don’t shut them down immediately. Save that for your later games!

On the flip side, neither should you roll over and let them win with no effort. You should be providing engaging scenarios that they have to overcome by using what they’ve learned about the mechanics so far. It’s really rewarding when a first timer starts to understand how to play and how to win, and it shows you’re doing a good job, too!

Also, I wouldn't recommend pointing out all of their tactical blunders, and how you could exploit them - this will only serve to demoralise. I mean, it should go without saying that you will be better at the game than the person who has literally never played before - there is no need to hammer the point home. 

7: Talk things through.

You shouldn’t just be guiding your newbie through their turn – talk through yours, too. Share your own strategy and talk through your options. This has 2 benefits – they will learn more quickly, and it tells your newbie that you’re there to teach, not to win. I’m sure we can all remember a time as kids when someone ‘teaching’ a game pulled a rule out of nowhere that felt made-up and unfair – this is what we need to avoid.  

Throughout your turn, explain the rules you are using, and how they’re letting you achieve your aims:

“I have left my horses more than 6 inches away from your infantry. This is because they can move further than your infantry can, so next turn I guarantee that I’ll be able to charge and can get my charge bonuses.”

And the other side is – have your newbie talk through their own decisions as they play. Once they have a few mechanics under their belt, encourage them to talk about what they’re trying to achieve each turn, and the options available to make it happen. This leads us on to…

8: Show, don’t tell.

It’s really important that you don’t just play their game for them. In order to digest what’s going on, it has to be your newbie that makes their own decisions. Obviously you’ll have to explain any new mechanics, but try to encourage them to use what they’ve already learned under their own initiative. The sooner they start actively making their own decisions, the sooner they’ll get engaged in the game – teaching becomes easier and both parties have more fun.  


9: Keep it consistent.

This one almost goes without saying… But make sure you’re familiar with the rules before you teach somebody the game. Maybe have a flick through the rulebook the week beforehand – especially the basics! We’ve all sat through a tutorial game where the teacher was referring to the rules every 30 seconds, and contradicting themselves frequently. It really kills any momentum or enjoyment – and it doesn’t exactly build confidence that you’re learning the game the correct way.

10: It’s just a game!

The game can be cruel. Dice will betray you and Heroes will fall flat on their faces at the worst possible times. Seasoned tournament players know to take these setbacks on the chin - but your newbie might find it extremely frustrating when Aragorn dies to a nameless orc after losing the duel 5 turns in a row.

The investment in tabletop gaming is high. We get really attached to our little plastic guys, and if your newbie has spent a couple of weeks assembling and painting their brand new Pelennor army, they are probably hoping to see them dominate on the table. As we know, this won’t always be the case.

Losses in tabletop games can be drawn out and disheartening. If your newbie doesn’t have a history with tabletop games, this can be rough. They may get salty. Compare this to video games, where victories and losses often both happen quickly - if you lose a match in a videogame, you can just pick yourself up and jump in to the next one. It's understandable that a newbie might find take a few games to adjust.

The important thing here is to remind your newbie that both players are participants in a shared, interactive storytelling experience – especially if there’s any salt over some duff dice. Yes, there will be a time for skill, mastery and heroic victories, but that's a long way away. During a tutorial game, neither party has anything to prove - all you need to do is enjoy yourselves. If the battle sways one way or the other, that’s just part of the story you’re both telling.

And for an intro game, more than any other: winning or losing doesn't make a damn bit of difference, as long as both players are having fun (and hopefully learning a thing or two along the way)!


And that’s it! If all goes according to plan, you’ll have a new player who has a good grasp of the basics and is eager to get stuck in. Watch in amusement as they proceed directly to the nearest game store and spend their last paycheck on a new army. After a few games, it’s probably a good idea for them to read the rulebook properly and get a fuller understanding of the rules, but until then, just throw some dice and have a good time.

Sunday, 11 October 2020

Fantasy Fellowship

 With the recent release of Quest of the Ringbearer, the Drawn Combat crew had a think about who they'd want in their Fantasy Fellowship - a great addition to play through the campaign with a Fellowship of your own design. Safe to say it looks like we had some different themes and concepts in mind between the four of us, so let's dive in!

Dave:
As soon as Games Workshop announced Quest of the Ringbearer, I was immediately excited by the idea of Fantasy Fellowship. I remember reading about it in an older issue of White Dwarf and at the time I didn't play SBG, but I remember thinking it was such a good idea!

Well, Jay Clare has outdone himself this time! Fantasy Fellowship is incredibly well put together, and there's been a lot of hype around it already. Naturally, I had to have a go at my own, whilst I love the original Fellowship, I couldn't help but wonder how they would have done on their quest if, lets say Gandalf, was replaced by Radagast! Here's what I put together for mine

Frodo was still my Ringbearer, I love Frodo, so I couldn't get rid of him! Sam was also not replaced, honestly, who could get rid of Sam!? In place of Merry and Pippin I've gone with Gaffer Gamgee and Farmer Maggot... They're just lke Merry and Pippin but older, right? Gandalf was replaced with Radagast, I'd loved to have replaced him with Gildor, but alas that model is long out of production.

In place of Aragron, Legolas and Gimli I've gone for Halbarad (with his Banner), Faramir and Haldir respectively. I absolutely love all 3 of these characters. Halbarad is great in the books, and Faramir is one of my favourite characters in the whole series. Controversially aswell, I really like Haldir from the films, when he shows up at Helms Deep. Finally, in place of Boromir, Prince Imrahil joins my Fantasy Fellowship. Again, he's an absolutely fantastic character!

I can't wait to give these guys a go on the table as soon as I can, I've already painted them all up!


Colm:
The theme of my Fantasy Fellowship is family and how they come together to support each other during their quest. Bilbo decides to take on the quest to destroy the ring after his 111th birthday, and his nephew Frodo comes as his companion to support him. Bilbo’s old friend Gaffer Gamgee won’t let him go alone and Sam won’t let either Frodo or the Gaffer leave him behind. 

Gandalf and Legolas are replaced by the husband and wife team of Galadriel and Celebron, destined to be separated by the Balrog in Moria. Gimli and Boromir’s spots are taken by Elladan and Elrohir with tragedy in store at Amon Hen. Lastly, Aragorn has long been known as a loner patrolling the wilds, but he is the perfect leader to bring the fellowship together as the 9th member and rightful king of men.

When pulling this force together I was struck by how many possibilities there were for fellowship compositions and stories to be told. I almost made Celebron Boromir’s replacement, but his death would be before he discovered his wife had lived was a Shakespearean level of tragedy I couldn’t handle. Elrohir will instead have to spend a large chunk of his quest grieving for his brother. This also allows for some interesting story telling in how the twins’ special rules are carried across the campaign. 

After writing this I’m already itching to get working on the next one! Hopefully some games will be possible before too long to see how this Fellowship gets on.


Dan Slob:

I love the idea of doing a fantasy fellowship campaign, I think it lends itself to doing something theme-y better than anything else in the hobby. With that in mind (and also with the thought that I wanted to only use models I own) I came up with the following:


Frodo with Sting and Mithril Coat

Sam

Gandalf 

Boromir, Captain of the White Tower (Aragorn) with Flag and Shield

Faramir (Legolas) with Bow

Hurin the Tall (Gimli)

Denethor (Boromir)

Beregond (Pippin)

Damrod (Merry)


I call this The Strength of Men. The idea here is that Gandalf has taken Frodo and Sam to Gondor for their aid. Frodo has his gifts from Bilbo who gave them to him before they left. Sam needs nothing more than his frying pan. 


Boromir is, of course, the mightiest warrior Gondor has so he will replace Aragorn. He has brought along his Banner of Minas Tirith because he has heard about “stealth” and wants no truck with it.


Faramir replaces Legolas as he is also pretty hot with a bow and has always felt that he could take down a Mumak single handedly. He’ll be competing for kills with Hurin the TALL who replaces Gimli (see what I did there?). No boxes needed for this giant, and he probably won’t need tossing across the gap to the causeway, he can just stride over it! 


Denethor is replacing his son as the one who goes mad and tries to take the ring. This definitely seemed like something Denethor would do, but at least now he has the chance to redeem himself by protecting the little ones; Beregond and Damrod. These two troublemakers are always smoking on the walls of Minas Tirirth and stealing old farmer Madril’s carrots. 


Gandalf is reprising his role as himself as he’s always enjoyed the bright lights of the big city. 


And so it came to pass that Gondor’s mightiest heroes did sally forth from Minas Tirith to do battle with Sauron. Though their path may be long and treacherous, the strength of men will conquer all. 


Steve:
As I did in our Evil Fellowship article - it's time for a heist.

Bilbo Baggins (Frodo)
Hamfast 'Gaffer' Gamgee (Sam)
Radagast the Brown (Gandalf)
Aldor (Merry)
Denethor (Pippin)
Celeborn (Aragorn)
Eómer (Boromir)
Rumil (Legolas)
Floi Stonehand (Gimli)

Bilbo Baggins is our main man, and he's getting the old gang and a few new faces together for one last job. When I say old, I mean old. The new faces are needed since most of my Fellowship are getting pretty far on in their years and are about to go out in one last hurrah. Gaffer, his long time friend, is along for the ride but he's not all to happy about it - and he'll let Bilbo know it was a bad idea! For a caper like this, you always need a Wizard. Unfortunately Gandalf was needed at the West End so Radagast filled in at the last second - not entirely a bad decision though as he has a guy on the inside...it's Sebastian. Sebastian is his guy on the inside. Who doesn't want to see some fun hedgehog infiltration shenanigans?

For the rest of the crew, they had to wake up Aldor, nearly got shot in the process but who knows when those twitchy reflexes will come in handy? Denethor seems a bit sketchy, but no doubt Bilbo has some plans up ahead for an inevitable double-cross twist regarding his potential liability. Floi, being the longtime bookkeeper for the crews ill gotten gains was brought back on with his encyclopedic knowledge of what they'd have to get through and how to use it against the enemy. Whilst not looking old, he certainly is in years as Celeborn brings some of his stoic-ness and level-headed thinking to the table - but not too bad in a punch up either. 

The young blood is brought in the form of Rumil - the blade man who no-one is taking down in a hurry, and Eómer brought on as the getaway driver in the end (although, as we know with the story of the Fellowship, it was a one way journey - and Eómer's ends sooner than the rest...).

What do you think to our Fellowships? We certainly had fun writing them. Let us know what choices you've made for yours along with any fun themes you're running with!

Monday, 28 September 2020

The Making of: Dwarrowdelf, a Khazâd-Dum Display Board

 After what feels like a long time, we're back! With the global pandemic going on we at Drawn Combat (along with many of you fine, reputable Hobbits) have been at a loss for games over the past few months. Instead, we've been knuckling down on the hobby side of things whether it be finishing up armies, starting entirely new ones or, in the case of a few of us, finally getting to work on some display boards we'd had planned. Today I'll be walking you through how I went about bringing a little piece of Khazâd-Dum to life in miniature form.


In this board, there are three main components: The pillars, the scaffolding and the board surface itself. First of all, we're going to start with the pillars as they're probably the longest part of the board itself (at least the way I went about doing it!). During lockdown, I got my hands on a resin 3D printer and after printing a few small bits of scenery I wanted to see if I could take it any bigger. The problem was, I'm not the best sculpter both physically and digitally. After a bit of searching, I found a spot on digital file by Angelo's Workshop (a full list of links and materials will be at the end of the article) of the pillars from Dwarrowdelf. I know not everyone has access to a printer, but there are a variety of services available online to print 3D files, and I would recommend resin over plastic purely for the smoother finish. 

After a good amount of trial and error, I was left with some pillars! 


In the end (due to the size of my printer and available resin) I had to print each pillar in three sections and it didn't leave me with the smoothest connecting points - out comes the green stuff and files. There was also the issue of the cracks in the pillars (as originally sculpted). My vision was for a Dwarrowdelf in it's prime during Durin's reign over the mountain kingdom. These were easily filled in with green stuff, but when working on the pillars I had the idea to leave one slightly damaged to add a little more flavour to the build. 

This flavour was going to be achieved by adding a scaffolding around the 'damaged' pillar, I imagined maintenance work and construction would still be going on, so gave the opportunity to break the board up a little and add some more details. To work on this I picked up a pack of balsa wood of varying sizes and a bag of matchsticks from a craft shop and broke out the hobby knife. Starting with a sheet of 3mm thick balsa, I cut 3mm width strips to form the main scaffolding skeleton and started sticking all the bits together with wood glue leaving adequate time to dry between constructing each part. One of the pillars was constantly on hand to reference make sure I had enough room to work with.


With most of the structure built, I did a preliminary section of boards made from matchsticks to solidify the structure a little more and make it easier to work with. It was at this point it struck me that the joints looked a little bare and odd, so I cracked out some 0.8mm braided rope to do a small wrap around to give it the impression it was all lashed together. 


All that was left now for the construction was the long process of cutting to size attaching all of the remaining boards made from the matchsticks. This took some time. I did however decide to add another level of scaffold skeleton on top, but after some conferring with the DC team left it bare of floorboards to avoid it looking too cluttered.

All that was left now for this part of the build was a bit of colour to bring it to life. This was achieved with a 1:1 mix of Citadel Contrast Wyldwood and Lahmian Medium to make the pot go a little bit further as the balsa wood just drinks it straight up! Afterwards the ropes at the joints were coated in Screaming Skull and washed with Agrax Earthshade to add a little bit of tone and shade. Some more detail would come later, but I left that until I had the board mostly finished and also decided to make a ladder with some left over bits that I had!

The next step was the big one - assembling and coating the board. The board size I had in mind was to fit into my Kallax shelving unit, so after cutting a chunky 2cm thick piece of mdf to size I gave a heavy coat of masonry paint and then smoothed over with a hard piece of card to give some nice semi-smooth surface detail (enough to not look lumpy, but not so much that there was no texture at all) and when dry I added the pillars with some wood glue.


Now onto the painting - I picked up a can of grey spray paint close enough to the final colour I was aiming for and coated the entire thing, making sure to get into the small nooks on the pillars and not miss anything off. Once dry, a watered down coat of Nuln Oil was applied to the entire board and pillars, taking care to not allow it to pool too heavily in ares of the pillars, removing any excess. After what felt like an eternity of waiting for the shade to dry, a combined mix of Dawnstone and Terminatus Stone (both Dry Citadel colours, mixed 3:2) was then used as a drybrushed coat all of the board and pillars, and then worked more into on the parts that would have been more foot travelled. The scaffolding was then added, and using the same paint mix, signs of wear and dirt were added along the floorboards, ramp and ladder to make it appear more used. The sides of the board were then coated in a very matte black (Stuart Semple) to frame it from every angle.


Now that the main construction was done, it was time for some more details. Once again I broke out the printer and got to finding files for various tools and masonry items: a wheelbarrow, sledgehammers and pickaxes. This would be placed around the scaffolding section of the board, and some old sprue was also cut up to form bits of chiseled stone to be used. With all the pieces in place, it was time to arrange the Dwarves and get the whole thing into the studio to photograph!


After this section of images were shot, I had the urge to do something a little more dramatic with the lighting, cue the fiery presence of the Balrog!


Well that about covers it for the making of this display board, we'll hopefully have some more hobby content on it's way for you soon. If you have any questions at all, please let us know in the comments!

Materials:
Balsa Wood, Wood Glue, Matchsticks (all of these available at hobby and craft shops).
0.8mm Braided Rope by Gale Force Nine
Masonry Paint - Goodhome Masonry Tester
Grey Spray Paint - Halfords
Citadel Paints - Nuln Oil, Agrax Earthshade, Dawnstone, Terminatus Stone, Lahmian Medium, Wyldwood, Screaming Skull
Black - Stuart Semple
Pillars made using Angelo's Workshop sculpt (https://www.thingiverse.com/thing:3652943) and printed on Elegoo Mars 3.


Friday, 17 July 2020

Community Content: Why you should go to an MESBG Tournament


In a very laborious and roundabout way Harry Parkhill (of the Entmoot podcast, and Battle Games in Middle Earth Youtube channel) discusses why you should join him at a tournament when the Great British Hobbit League restarts later this year.


I always had this preconceived notion about wargaming tournaments; that they were full of the kind of nerds you never like to think of yourself as. You know the ones, they’re a little too into the game, they know just a little too much about the profiles and they’re perhaps a little bit more touchy about how long 6 inches is.

“That’s a long Six inches”, they’d say.

I had this notion because it had been inherited from ‘groupthink’ at the gaming club in my hometown. When I told them I was heading off to Warhammer World for a 40k school league event, they said they hated tournaments. It was all “too competitive”; people were unwelcoming and often downright rude they claimed. Even though that tournament was great fun (we actually won!), I never made the effort to go to one again. I guess I was young, I didn’t have access to a car, and my mum has always been the first to laugh at my ‘nerdiness’ when I mention Warhammer so it’s fair to say I wasn’t keen on the idea of convincing her for a lift to spend the weekend doing it.

So I didn’t.

That tournament was consigned to history. History became Legend. Legend became myth. And for six-and-a-half years (roughly) that memory passed out of all knowledge.


Then the unlikeliest thing happened. I picked out one of my oldest and favourite plastic models (a Minas Tirith Warrior) from the Middle Earth range and put paint and brush to it. The reason was that in 2016 rumours had circulated that Games Workshop weren’t going to renew their license to make Middle Earth models (don’t trust rumours). I was horrified. This was my childhood; the reason I got into wargaming. I began pouring through eBay (back when it had a Capital B in the middle – aah, those were the days). I bought pretty much anything – but particularly the old metal sculpts I assumed would be first to go. It was a furious and addictive spending spree. My quizzical girlfriend was confused as to why I was buying so much and painting so little, but what does she know of such necessities!? They’re mine, I didn’t feel like parting with them, they came to me (in the post).
Then as luck would have it, I stumbled on the unlikeliest of videos. Whilst searching for painting tutorials, I stumbled across a battle report. What’s this? A ring… of people still playing the game?


I had never really played the Lord of the Rings Strategy Battle Game, I’d only played a bit on my own, and maybe with some of my friends when I was at primary school. But it was never the ‘actual’ game, using the official rules, just some weird quasi-dice-rolling-army-man game. Here were people actually doing it, and not all that long ago (I watched it, according to my Youtube watch history, in April 2016 and it had been released in November 2014).

From there I discovered the GBHL Facebook page, and the league itself. “What must I do?” I thought. I couldn’t live vicariously through these videos when the world was on my doorstep. So I bundled my sleeping roll together, grabbed my walking staff and headed to a tournament in Nottinghamshire. I met a few people who made a fantastic impression (Dan Entwistle, as the welcoming organiser particularly stood out) They helped shepherd me into a world which was simultaneously challenging and exhilarating. It’s never easy making new friends, but I tried with gusto to ingratiate myself into the groups of people who clearly knew one another (hopefully I wasn’t “that guy” who was a bit too friendly). I was taught valuable lessons about the game (mainly how to play it… but also about putting heroes behind your troops so crossbows don’t cut them down) but I also found there was passion and heart in the Middle Earth Scene.

These weren’t the finicky, unpleasant nerds I’d worried about – these were warm-hearted people I shared a great passion with. Not just the gaming and the models, but the worlds of Tolkien too. I was joining an exciting adventure, a new phase in my life with friendships that were no longer defined by school, university, work, or even where I lived, but by a fierce passion. These people were willing to travel to Nottinghamshire from around the country (and I’d been willing to travel on the gamble that I’d enjoy it), we had been united by that cause.


 From there, came more tournaments, including meeting and/or playing against various members of the Middle Earth team at Throne of Skulls, but also seeing familiar faces and building on those early games, slowly adding people to the list of people I could feel comfortable wandering over to for a chat between games.

This feeling of belonging is something difficult to find in adult life – and is something which I think most of us probably search for. We connect with people for a number of reasons, but common interests are probably top of that lists.

So think about it; SBG tournaments combine so many niche passions – reading, painting, modeling, the worlds of Tolkien, the films of Peter Jackson, the pleasure of pulling together the puzzle pieces in an army list, the delight of challenging someone to a game of wits, the spirit of adventure that comes by travelling to another part of the country (or world), and of course the social interaction that comes from spending time in the company of strangers who share all these interests. That’s a long list, and if you think any of those sounds like fun then you’d fit right in.

So why should you go to an MESBG tournament? Ultimately, you’re already interested, because you’re reading this. There’s already a box of tinder, and pyramid of wood waiting, all you need is the spark which roars into all consuming fire that this hobby can be. You can be the next companion in this Fellowship of tournament goers.

Great… When are we going?

Dan Slob: Thanks so much Harry! Check out the excellent Entmoot Podcast here! 


Tuesday, 14 July 2020

Conversion Corner: Corsair Reavers

Today Will is going to show you how to do some simple but effective conversions for Corsair Reavers. Enjoy.


So here we are again in Conversion Corner, this article is going to show you how to convert some of your unused Corsair bowmen models into Reavers. Seeing as there is no model for these and the fact the bowmen are the most underused model in the faction it makes sense to at least use these to your advantage. I am going to show you the 4 different bowmen models and show you different ways to convert each one. Also a nice little trick even if you don't have any bits at all. Being pirates you can use all sorts of different styles of weapons so raid your unwanted/unused models and see what you can come up with.

Things you'll need:

The sculpting tools and tweezers aren't 100% necessary. A cocktail stick will do the job just as well.


Bowman 1


So here is the trick using the first one and probably the easiest. Firstly, cut the bow bits off the top and bottom...DON'T throw the cut off bits away.  Clean up the model's rough bits left from cutting and flatten off 1 of the off cuts at the bottom using a hobby knife or file. The other one should be left with a V shaped end.


A) Using Plastic cement glue the flat ended piece to the left hand of the model. You can create a less curved style sword by cutting at a different angle, but I liked the funky style of this one and thought it suited their pirate nature.

B) Again, using plastic cement glue the second one into the recess of the hand. You will notice it is much easier to place due to the v shape created by the clippers. 

And hey presto, one simple and easy Reaver using no extra parts or much hassle.

**You could if you wanted to create a more pointed shape on these "swords" before fitting them if you wished but for the purposes of this and who I wanted to target with this I didn't bother.

Bowman 2

The beauty of this bowman is he basically comes pre-prepped for you. Firstly, find a sword/axe or any sort of weapon you like that can be placed in the hand and a right hand and weapon off an old model or out of a bit box. I found here that a Morannon Orc axe hand was perfect and a serpent horde sword from the serpent rider kit fit perfectly. File down the hand to sit as flush as possibly with the rest of the arm. If you need to cut down the inside, you can as this will not be seen.

Simply glue or stick the hand with weapon and the weapon green stuff making a smooth transition using water and a tool or even a cocktail stick. and you are done.


Bowman 3

This one takes a little more finesse than the previous 2.  Initially you need to cut the bow off, but this is also attached to the leg so be as careful as possible and just clean up the leg as you would normally if you were cutting it from a sprue. The hand is a little trickier. Cut off the hand from the end of the fabric up to the hair and the feathers of the arrows. You essentially want to cut out the block like in the third picture. Don't worry too much about how smooth it is as this will not be seen.


Again, for this I used the same morannon axe hand as I did in the previous model.  I had to play around with my hobby knife for a little while to fiddle with the correct fit, but it didn't take long. I then used the green stuff to stick it in place and shape some more hair. You can again use plastic cement for this which is also great as it melts the plastic creating a smooth transition.


The left hand I used a random sword I had lying about and used the same method as the previous models. Like I said, these are pirates not soldiers, so I like the fact they have different weapons.

After an hour I revisited any excess green stuff I didn't like the look of and just cut it out. Another one done.

Bowman 4


Again, another tricky on but believe me when I say if I can do it you can too. Cutting off the bow...no change. The hand though was a little more difficult. In order to cut the hand, you must cut it flat along the model initially and then chop in at the wrist. I then dry fitted the hand I found in my bits box which after a little shaving on the model fit nicely. Here I have used an axe but I previously had a practice model using a Minas Tirith sword hand which also fit well. This will take a little time and shaving the flat part of your cut. Just be patient and don't expect it to fit perfectly. You always have green stuff to help make it look natural.

To attach the hand, I used plastic glue to melt the inside of the hand a little better to the model and then used a tiny amount of green stuff to finish it off. Again, after an hour I trimmed any excess off that I didn't like. The sword I attached in the same way as the others also adding a little pommel underneath.


And there you have it. 4 quick and easy Reavers from your unused models. Let us know what you think and if you have some of your own why not show us.  I'll try and get them painted up for another blog so you can see how they turned out.